
Fig: Microservice Architecture with Spring Boot, Spring Cloud, JPA-Hibernate, Discovery Service (Consul), API gateway using Zuul Proxy and Centralized Authentication with JSON Web Token (JWT)
This is the diagram which I will implement in this article. Don’t be so serious to implement this microservice architecture in production but hopefully it will help you to learn something new. To implement the microservice I will follow the bottom up approach (Todo management service, todo query service, consul discover service, API gateway and JWT) . In this article I will cover the following topics:
- Spring
Boot application – todomanagement-service (Microservice -
1)
- Spring
Boot application - todo-service (Microservice -
2)
- Integrating Spring Boot application with Consul discovery / Service Registry
- Create Spring Boot API Gateway using Zuul Proxy and Integrating with Consul discovery / Service Registry
- Centralized microservice security with JSON Web Token (JWT)
Bullet point 1 and 2 is nothing but a simple spring boot application but 3, 4 and 5 will be interesting. In this article we will mainly focus on implementation and I am not going too much theoretical approach. So no more talk, let’s start the implementation.
1. Spring Boot application - todo management service (Microservice- 1):
Here my target is to create a service which will let you create a todo item and save it into the mysql database and you can also the get or delete todo item from db. Now I will create a spring boot project from spring initializer (https://start.spring.io/). Go to the spring website and select the item by following screen shoot. Finally click on Generate button and import the project into eclipse as a maven project.

After importing the project, you may face some error for maven version dependency. To avoid this hustle, replace the properties tag with below code:
<properties>
<java.version>1.8</java.version>
<spring-cloud.version>2020.0.1</spring-cloud.version>
<maven-jar-plugin.version>3.1.1</maven-jar-plugin.version>
</properties>
And also add dependencyManagement tag under the dependencies closing tag in pom.xml file:
<dependencyManagement>
<dependencies>
<dependency>
<groupId>org.springframework.cloud</groupId>
<artifactId>spring-cloud-dependencies</artifactId>
<version>${spring-cloud.version}</version>
<type>pom</type>
<scope>import</scope>
</dependency>
</dependencies>
</dependencyManagement>
Then right click on project and run a maven update from eclipse UI. Now execute the below database script in the mysql console to create the database and table:
CREATE DATABASE microservice;
CREATE TABLE todo (
id int,
user_name varchar(56),
todo_item varchar(1000),
PRIMARY KEY (id)
);
Note: To avoid
the unnecessary compile error when you create the java classes try to maintain
the package structure
which I follow.
Let’s create the entity class Todo.java to persist the todo table data:
package
com.service.todomanagement.model;
import javax.persistence.*;
@Entity
@Table(name = "todo", catalog = "microservice")
public class Todo {
@Id
@GeneratedValue(strategy =
GenerationType.AUTO)
@Column(name = "id")
private Integer id;
@Column(name = "user_name")
private String userName;
@Column(name = "todo_item")
private String todoItem;
public Todo() {
}
public Todo(String userName, String todoItem) {
this.userName = userName;
this.todoItem = todoItem;
}
public Integer getId() {
return id;
}
public void setId(Integer id) {
this.id = id;
}
public String getUserName() {
return userName;
}
public void setUserName(String userName) {
this.userName = userName;
}
public String getTodoItem() {
return todoItem;
}
public void setTodoItem(String todoItem) {
this.todoItem = todoItem;
}
}
To get the todo list make a pojo class Todos.java:
package
com.service.todomanagement.model;
import java.util.List;
public class Todos {
private String userName;
private List<String> todos;
public Todos() {
}
public Todos(String userName, List<String> todos) {
this.userName = userName;
this.setTodos(todos);
}
public String getUserName() {
return userName;
}
public void setUserName(String userName) {
this.userName = userName;
}
public List<String> getTodos() {
return todos;
}
public void setTodos(List<String> todos) {
this.todos = todos;
}
}
Note: follow the package structure com.service.todomanagement.model
Now create a repository interface TodosRepository.java which will be used to get the todo item list by user name from DB. So, let’s create it:
package
com.service.todomanagement.repository;
import java.util.List;
import org.springframework.data.jpa.repository.JpaRepository;
import
com.service.todomanagement.model.Todo;
public interface TodosRepository extends JpaRepository<Todo,
Integer> {
List<Todo> findByUserName(String username);
}
Now we will make a rest controller which will provides /add todo rest service, get todo list by /{username} and /delete/{username} todo rest service.
package com.service.todomanagement.controller;
import java.util.List;
import java.util.stream.Collectors;
import
org.springframework.beans.factory.annotation.Autowired;
import
org.springframework.web.bind.annotation.GetMapping;
import
org.springframework.web.bind.annotation.PathVariable;
import
org.springframework.web.bind.annotation.PostMapping;
import org.springframework.web.bind.annotation.RequestBody;
import
org.springframework.web.bind.annotation.RequestMapping;
import
org.springframework.web.bind.annotation.RestController;
import
com.service.todomanagement.model.Todo;
import com.service.todomanagement.model.Todos;
import
com.service.todomanagement.repository.TodosRepository;
@RestController
@RequestMapping("/rest/db")
public class TodoServiceController {
@Autowired
private TodosRepository todosRepository;
@GetMapping("/{username}")
public List<String> getTodos(@PathVariable("username") final
String username) {
return getTodosByUserName(username);
}
@PostMapping("/add")
public List<String> add(@RequestBody final Todos todos) {
todos.getTodos().stream().map(todo -> new Todo(todos.getUserName(), todo))
.forEach(todo -> todosRepository.save(todo));
return getTodosByUserName(todos.getUserName());
}
@PostMapping("/delete/{username}")
public List<String> delete(@PathVariable("username") final
String username) {
List<Todo> todos = todosRepository.findByUserName(username);
todos.stream().filter(todo -> username.equals(todo.getUserName()))
.forEach(todo -> todosRepository.delete(todo));
return getTodosByUserName(username);
}
private List<String> getTodosByUserName(@PathVariable("username") String username) {
return todosRepository.findByUserName(username).stream().map(Todo::getTodoItem).collect(Collectors.toList());
}
}
Add the following configuration in application.properties file for application and mysql database:
spring.application.name=todomanagement-service
server.port=8181
spring.datasource.url=jdbc:mysql://localhost:3306/microservice
spring.datasource.username=root
spring.datasource.password =Admin@12345
spring.jpa.show-sql=true
spring.jpa.hibernate.ddl-auto=update
spring.jpa.properties.hibernate.dialect=org.hibernate.dialect.MySQL5Dialect
Let’s start the todomanagement-service:
From eclipse select > TodomanagementApplication.java Run as > Spring Boot App/Java Application.
Now we will test this service using post man, you can use any other client which one is your favorite.
Add todos:
Service Url: http://localhost:8181/rest/db/add
Add Header: Content-Type: application/json
Request and Response Screen shoot:

Check the todo delete and get service by yourself.
2. Spring Boot application - todoquery-service
(Microservice
- 2):
Now my purpose is to create the todoquery-service which will gives the todo preview against the
user name. Let’s create the service using spring initializer - https://start.spring.io/

Click generates, extract the project and import it into the eclipse as a maven project. It may show some error due to maven version dependency. To avoid this hustle replace the properties tag with below code:
<properties>
<java.version>1.8</java.version>
<spring-cloud.version>2020.0.1</spring-cloud.version>
<maven-jar-plugin.version>3.1.1</maven-jar-plugin.version>
</properties>
And also add dependencyManagement tag under the dependencies closing tag in pom.xml file:
<dependencyManagement>
<dependencies>
<dependency>
<groupId>org.springframework.cloud</groupId>
<artifactId>spring-cloud-dependencies</artifactId>
<version>${spring-cloud.version}</version>
<type>pom</type>
<scope>import</scope>
</dependency>
</dependencies>
</dependencyManagement>
Let’s put some configuration for application name and port in application.properties file:
spring.application.name=todoquery-service
server.port=8282
Now create pojo class Todo.java to persist the todo data:
package
com.service.todoquery.model;
public class Todo {
private Integer id;
private String userName;
private String todoItem;
public Todo() {
}
public Todo(String userName, String todoItem) {
this.userName = userName;
this.todoItem = todoItem;
}
public Integer getId() {
return id;
}
public void setId(Integer id) {
this.id = id;
}
public String getUserName() {
return userName;
}
public void setUserName(String userName) {
this.userName = userName;
}
public String getTodoItem() {
return todoItem;
}
public void setTodoItem(String todoItem) {
this.todoItem = todoItem;
}
}
In this application we will consume the rest api from todomanagement-service using restTemplate to get the todo list by user name. So, create Config.java class for rest template bean:
package com.service.todoquery.config;
import
org.springframework.context.annotation.Bean;
import org.springframework.context.annotation.Configuration;
import
org.springframework.web.client.RestTemplate;
@Configuration
public class Config {
@Bean
public RestTemplate
restTemplate() {
return new RestTemplate();
}
}
Let’s create the controller which will provide a GET rest service about the todo’s preview against the user name:
package com.service.todoquery.controller;
import java.util.List;
import org.springframework.beans.factory.annotation.Autowired;
import org.springframework.core.ParameterizedTypeReference;
import
org.springframework.http.HttpMethod;
import
org.springframework.http.ResponseEntity;
import
org.springframework.web.bind.annotation.GetMapping;
import
org.springframework.web.bind.annotation.PathVariable;
import
org.springframework.web.bind.annotation.RequestMapping;
import
org.springframework.web.bind.annotation.RestController;
import
org.springframework.web.client.RestTemplate;
@RestController
@RequestMapping("/rest/todos")
public class TodoqueryServiceController {
@Autowired
RestTemplate
restTemplate;
@GetMapping("/{username}")
public List<String> getTodos(@PathVariable("username") final
String userName) {
ResponseEntity<List<String>> todoResponse = restTemplate.exchange("http://localhost:8181/rest/db/" + userName,
HttpMethod.GET, null, new
ParameterizedTypeReference<List<String>>() {
});
return todoResponse.getBody();
}
}
Let’s start the todoquery-service:
From eclipse select > TodoqueryApplication.java Run as > Spring Boot App/java application.
Service Url:
http://localhost:8282/rest/todos/{username}
Request
and Response:

3. Integrating Spring Boot application with Consul discovery / Service Registry:
Consul offers multiple data centers and delivering a scalable, highly available, abstract and resilient service. Consul Service act like a one stop service for microservice. Distributed application can use Consul for dynamically discovering the service endpoint. It also offers the health checking of registered service, in-memory KV store, Secure Communication, client load balancing, etc.
Download and
Configure the Consul Service:
To centralize the configuration using Spring Cloud Consul follow below steps:
1.
Download consul server from https://www.consul.io/downloads and extract it.
2.
Then open the command prompt with as administrator and go to the
folder directory where you put the consul.exe file.
3. Find and copy the local machine IP by using below command in command prompt: ipconfig
4.
Now run the below command:
consul agent -server -bootstrap-expect=1 -data-dir=consul-data -ui
-bind=YOUR_IP_ADDRESS
Example for my local machine:
consul agent -server -bootstrap-expect=1 -data-dir=consul-data -ui -bind=192.168.0.101
5.
Now check the service from browser http://localhost:8500/
At this stage we
need to do some modifications for two microservices todomanagement-service and todoquery-service to
integrate with consul service.
Integrate todomanagement-service:
Add below dependency in pom.xml file:
<dependency>
<groupId>org.springframework.cloud</groupId>
<artifactId>spring-cloud-starter-consul-discovery</artifactId>
</dependency>
<dependency>
<groupId>org.springframework.boot</groupId>
<artifactId>spring-boot-starter-actuator</artifactId>
</dependency>
Now run the TodomanagementApplication.java class as a spring boot app/ java application and refresh the Consul from browser: http://localhost:8500/

Integrate todoquery-service:
Similarly add all dependency which is already we did for todomanagement-service in pom.xml file and update the project. Now add @EnableDiscoveryClient annotation on top of @RestController to discover the todomanagement-service and also replace the todoquery-service url with the service name and also autowire the DiscoveryClient to retrieve services and instances data from Consul. Finally the class will be looke like below:
package com.service.todoquery.controller;
import java.net.URI;
import java.util.List;
import org.springframework.beans.factory.annotation.Autowired;
import org.springframework.cloud.client.discovery.DiscoveryClient;
import
org.springframework.cloud.client.discovery.EnableDiscoveryClient;
import
org.springframework.core.ParameterizedTypeReference;
import
org.springframework.http.HttpMethod;
import org.springframework.http.ResponseEntity;
import
org.springframework.web.bind.annotation.GetMapping;
import
org.springframework.web.bind.annotation.PathVariable;
import
org.springframework.web.bind.annotation.RequestMapping;
import org.springframework.web.bind.annotation.RestController;
import
org.springframework.web.client.RestTemplate;
@EnableDiscoveryClient
@RestController
@RequestMapping("/rest/todos")
public class TodoqueryServiceController {
@Autowired
RestTemplate
restTemplate;
// For consul service
@Autowired
DiscoveryClient
discoveryClient;
@GetMapping("/{username}")
public List<String> getTodos(@PathVariable("username") final
String userName) {
/*
* ResponseEntity<List<String>>
todoResponse =
* restTemplate.exchange("http://localhost:8181/rest/db/"
+ userName,
* HttpMethod.GET, null, new
ParameterizedTypeReference<List<String>>() { });
*/
// Start for consul service integration
URI
baseUrl = discoveryClient.getInstances("todomanagement-service")
.stream()
.map(service -> service.getUri())
.findFirst().map(url -> url.resolve("/rest/db/" + userName)).get();
ResponseEntity<List<String>>
todoResponse = restTemplate.exchange(baseUrl, HttpMethod.GET, null, new
ParameterizedTypeReference<List<String>>() {});
// End for consul integration
return todoResponse.getBody();
}
}
Now run the TodoqueryApplication.java class as a spring boot app and refresh the Consul from browser: http://localhost:8500/ and see both microservice are registered in consul service.

See the below line TodoqueryServiceController.java file,
URI baseUrl = discoveryClient.getInstances("todomanagement-service")
.stream()...
Here we are not to telling the API url but the service name only, this is an example how microservices are talking with each other’s via service registry. Now check the todoquery-service API using postman or any other client to see the Consul magic.
todoquery-service API URL: http://localhost:8282/rest/todos/Sara

4.
Create
Spring Boot API Gateway using Zuul Proxy and Integrating with Consul discovery
/ Service Registry:
For API Gateway we will use embedded Zuul proxy service of Spring Cloud Netflix. It will act like a front door or entry point to handling all the request and perform dynamic routing for our microservices.
At this stage we have 2 microservices
- todomanagement-service:
http://localhost:8181/rest/db/add
http://localhost:8181/rest/db/delete
/{username}
- todoquery-service:
http://localhost:8282/rest/todos/{username}
In this section we will prepare a API gateway using zuul service and all those request will be receiving by this API gateway and the API gateway dynamically discover which service will invoke based on the request.
Let’s start making the gateway service step by step:
Go to the spring initializer website and select the item by following the screen shoot. Finally click on Generate button and import the project in eclipse as a maven project.

After importing the project, you might be faced some error about maven dependency because of maven versions. To bypass this unexpected issue, you have to add below properties inside the <properties> tag:
<maven-jar-plugin.version>3.1.1</maven-jar-plugin.version>
After adding the properties just run a maven update from the eclipse editor and hopefully all error will be disappeared. Now we will configure the API gateway and integrating it with consul service. For this task, create a application.yml file and place it into the resources folder of the project.
application.yml content:
spring:
application:
name: gateway-service
server:
port: 8383
cloud:
consul:
host: localhost
port: 8500
discovery:
healthCheckInterval: 5s
We will maintain another configuration file for the microservice routing. For this, create a bootstrap.yml in resources folder and place the below content into the file:
zuul:
#Service
will be mapped under the /api URI
ignored-patterns: /actuator/**
prefix: /api
routes:
todomanagement-service:
path:
/todomanagement-service/**
serviceId: todomanagement-service
stripPrefix: true
todoquery-service:
path: /todoquery-service/**
serviceId: todoquery-service
stripPrefix: true
Now add below dependency in pom.xml for consul integration:
<dependency>
<groupId>org.springframework.cloud</groupId>
<artifactId>spring-cloud-starter-consul-config</artifactId>
</dependency>
<dependency>
<groupId>org.springframework.cloud</groupId>
<artifactId>spring-cloud-starter-consul-discovery</artifactId>
</dependency>
<dependency>
<groupId>org.springframework.boot</groupId>
<artifactId>spring-boot-starter-actuator</artifactId>
</dependency>
At this stage we have configured the API gateway service as gateway-service on port 8383 and also integrating the service with
consul service in application.yml file. After that we have configured the
routing todomanagement-service and todoquery-service
in bootstrap.yml file.
We are almost in the finishing stage. Now open the ApigatewayApplication.java file and add @EnableZuulProxy annotation just below @SpringBootApplication to enable the Spring Cloud Netflix embedded Zuul proxy. Then add @EnableDiscoveryClient annotation to register the Spring Boot server (gateway-service) with the discovery server (consul service). After all configuration the ApigatewayApplication.java file will look like below:
package com.service.apigateway;
import org.springframework.boot.SpringApplication;
import
org.springframework.boot.autoconfigure.SpringBootApplication;
import
org.springframework.cloud.client.discovery.EnableDiscoveryClient;
import
org.springframework.cloud.netflix.zuul.EnableZuulProxy;
@SpringBootApplication
@EnableZuulProxy
@EnableDiscoveryClient
public class ApigatewayApplication {
public static void main(String[] args) {
SpringApplication.run(ApigatewayApplication.class, args);
}
}
Now run ApigatewayApplication.java as a java application and ensure that the others service is up and running. So, now we can call the microservice via API gateway instead of direct call.
For todo add service in todomanagement-service:
Url: http://localhost:8383/api/todomanagement-service/rest/db/add
Method:POST
Content-Type:
application/json
Body:
{"userName": "Ibrahim","todos":
["Task-1","Task-2","Task-3 "]}
Here is the screen shoot:

To user todo list from todomanagement-service:
Url: http://localhost:8383/api/todomanagement-service/rest/db/delete/{username}
For todo query service in todoquery-service:
Url: http://localhost:8383/api/todoquery-service/rest/todos/{username}
Here is the screen-shoot:

5. Centralized microservice security with JSON Web Token (JWT):
There are many ways to securing the application but in this article we will focus only in JSON Web Token. To centralize the microservice security we will add JWT mechanism in API gateway service instead of implementing on microservice separately. Here we will go directly in implementation.
To know details about JWT you can read my another article, it will
give you a complete overview on JWT with spring boot:
https://javatechlearning.blogspot.com/2021/03/spring-boot-token-and-role-based.html.
Here we will create a service endpoint to create user and login to generate the JSON Web Token. After that user will access the todomanagement-service and todoquery-service by sending the JSON Web Token through the request header. For the simplicity of this long article we will omit the role base authentication.
To integrate the JWT with API gateway follow below step by step
instruction:
Database Table Creation:
Execute below script in mysql database to store the user’s information. We are using same database schema to keep the users, role and user role data.
CREATE TABLE users (
id int,
username varchar(56),
password varchar(256),
PRIMARY KEY (id)
);
CREATE TABLE
user_roles (
userid int,
roleid int,
PRIMARY KEY (userid,roleid)
);
CREATE TABLE roles (
id int,
name varchar(56),
PRIMARY KEY (id)
);
INSERT INTO roles(id,name) VALUES(1,'ROLE_USER');
INSERT INTO roles(id,name) VALUES(2,'ROLE_ADMIN');
For JWT security integration add bellow dependency in pom.xml of gateway-service:
<dependency>
<groupId>org.springframework.boot</groupId>
<artifactId>spring-boot-starter-security</artifactId>
</dependency>
<dependency>
<groupId>org.springframework.boot</groupId>
<artifactId>spring-boot-starter-data-jpa</artifactId>
</dependency>
<dependency>
<groupId>mysql</groupId>
<artifactId>mysql-connector-java</artifactId>
<scope>runtime</scope>
</dependency>
<dependency>
<groupId>io.jsonwebtoken</groupId>
<artifactId>jjwt</artifactId>
<version>0.9.1</version>
</dependency>
Before writing any code we will configure the data source for mysql database and JWT configuration in Application.properties file:
jwt.signing.key.secret=mySecret
jwt.get.token.uri=/authenticate
jwt.refresh.token.uri=/refresh
jwt.http.request.header=Authorization
jwt.token.expiration.in.seconds=1800
spring.datasource.url=jdbc:mysql://localhost:3306/microservice
spring.datasource.username=root
spring.datasource.password
=Admin@12345
spring.jpa.show-sql=true
spring.jpa.hibernate.ddl-auto=update
spring.jpa.properties.hibernate.dialect=org.hibernate.dialect.MySQL5Dialect
Create entity/model classes:
Copy the class file from below git repository and place it under the package com.service.apigateway.jwt.model
Create Repository:
Copy the class file from below git repository and place it under the package com.service.apigateway.jwt.repository
Create Service:
Copy the class file from below git repository and place it under the package com.service.apigateway.jwt.service
Configure Spring Security for JWT:
Copy the class file from below git repository and place it under the package com.service.apigateway.jwt.security
Create API Controller:
Copy the class file from below git repository and place it under the package com.service.apigateway.jwt.controller
After adding the above class file, all
compilation error should be gone and then restart the gateway-service. Also ensure that the consul service,
todomanagement-service and todoquery-service is up and running.

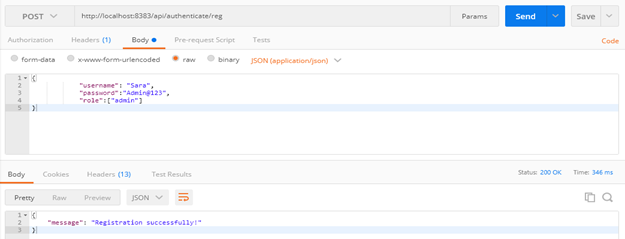
Now create user by consuming the registration service:
http://localhost:8383/api/authenticate/reg
Method: POST
Content-Type: application/json
Message Body: {"username": "Sara","password":"Admin@123","role":["admin"]}
Now login with this user credential to generate the JSON Web Token:
Url: http://localhost:8383/api/authenticate/login
Method: POST
Content-Type: application/json
Message Body: {"username": "Sara","password":"Admin@123"}

Keep the access token to consume the todomanagement-service and todoquery-service
Now for checking the service try to consume todoquery-service without using the access token and it should return 401

So, it’s time to access the service with valid token. To consume the todoquery-service add the access token in request reader like below:
Authorization: Bearer XXXXXXXXXXX

Here you can get the full source code:
https://github.com/ibrahimcseku/microservice
See Also:
No comments:
Post a Comment